Spring Bar Tool Guide: Which One to Buy & How to Change a Strap Without Scratching Lugs
If you own more than one strap, sooner or later you will need a spring bar tool.
And when that moment comes, most people make the same mistake: they assume changing a strap is too simple to get wrong.
Then the tool slips.
The lug gets scratched.
The spring bar flies across the room.
And a five-minute strap swap becomes an annoying little disaster.
The good news is that changing a strap is not difficult. The bad news is that it is easy to do badly.
That is why the right question is not just “How do I change a watch strap?”
It is:
“Which spring bar tool should I buy, and how do I use it without damaging my watch?”
This guide answers both.
The short answer
If you only want one spring bar tool, buy a good fork-tip tool with a comfortable handle and a replaceable fine fork. That is the best all-around option for most watch owners.
If you mainly change bracelets, work on watches with tight end links, or swap straps often, a tweezer-style spring bar tool can be worth the extra money.
If you only change straps once in a while, you do not need an expensive kit. But you do need a tool that feels precise, not flimsy.
And if your goal is to avoid scratching the lugs, the secret is not just the tool. It is the setup:
- tape the lugs,
- work slowly,
- support the watch properly,
- and compress the spring bar with control instead of force.
Who this guide is for
This article is for you if:
- you want to swap straps at home,
- you are tired of paying for a simple strap change,
- you are buying your first spring bar tool,
- or you already scratched a lug once and do not want to repeat the experience.
It is especially useful if you like changing the look of a watch depending on season, outfit, or comfort. If that is you, Watch Strap Materials Guide: Bracelet vs Leather vs Rubber vs Nylon (What to Choose) pairs naturally with this article.
What a spring bar tool actually does
A spring bar tool helps you compress the small spring-loaded bar that holds a strap or bracelet between the lugs.
That sounds simple, and it is.
But the space between strap, lug, and spring bar shoulder is often tight. On some watches it is easy. On others, especially those with fitted end links or stiff leather straps, it takes more precision than first-time owners expect.
A spring bar tool is not just there to “pop the strap off.” It helps you:
- remove straps with control,
- reinstall straps accurately,
- reduce the risk of scratching the inside of the lugs,
- and avoid bending or damaging spring bars during the process.
If you wear watches differently through the week, that matters. A leather strap for the office, rubber for summer, nylon for travel, or bracelet for daily wear can completely change a watch. That is one reason strap-swapping is one of the most useful watch-owner skills to learn.
A real-world example
Let’s say you own one 39mm sports watch on bracelet.
In summer, you want it on rubber.
In cooler months, you prefer leather.
When traveling, you want nylon because it feels lighter and easier.
You could take the watch to a shop every time. But after a few changes, that becomes inconvenient and unnecessary.
So you buy the cheapest spring bar tool you can find online.
It arrives. The metal feels rough. The fork tip is too thick. You try to remove the bracelet, the tip slips off the spring bar shoulder, and now you have a neat little scratch on the inside of the lug.
The watch still works. But the moment is frustrating, and most people then decide strap changes are “not for them.”
Usually, the real problem is not the task.
It is the combination of bad tool + bad setup + too much confidence too early.
Which spring bar tool should you buy?
There is no single best tool for everyone. The right choice depends on what you are changing and how often you plan to do it.
1. The standard fork-tip spring bar tool
This is the best starting point for most people.
It usually has:
- a forked end for compressing spring bars,
- sometimes a pointed end on the other side,
- and a pen-style or handled body.
Best for:
Leather straps, rubber straps, nylon straps, and general home use.
Why it works:
It is simple, affordable, and good enough for most strap changes if the fork is fine enough.
When it disappoints:
Cheap versions often have rough tips, poor grip, or forks that are too thick for tighter spaces.
2. The fine fork tool
This is really a better version of the first type rather than a different category.
A fine fork gives you more control when working between tighter lug spaces and slimmer strap ends.
Best for:
Owners who care about not scratching lugs and want a noticeably better experience.
Why it is worth it:
The difference between a clumsy fork and a refined fork is bigger than most people expect.
3. The pointed-tip end
Some spring bar tools have a pointed end on the back. This is useful for watches with drilled lugs or for certain small adjustments, but it is not the star of the show for most strap changes.
Best for:
Drilled lugs, occasional pin work, or extra versatility.
Why it matters:
Nice to have. Not the main reason to buy the tool.
4. The tweezer-style spring bar tool
This is the more advanced option.
Instead of compressing one side at a time, a tweezer-style tool lets you compress both ends of the spring bar together. That makes bracelet removal much cleaner, especially on fitted metal bracelets.
Best for:
Frequent strap swappers, bracelet users, collectors, and anyone working on tighter end-link setups.
Why people love it:
It feels more controlled and often reduces the “tool slip” moments that cause scratches.
Why not everyone needs it:
It costs more, and if you only change leather or rubber straps a few times a year, it may be unnecessary.
My practical buying advice
If you are buying your first spring bar tool, do this:
Buy one good fork-tip tool with replaceable tips.
That is the sweet spot for most owners.
It is affordable enough, easy to use, and suitable for most strap changes. You can always add a tweezer-style tool later if you start changing bracelets more often.
Avoid buying:
- ultra-cheap no-name tools with chunky forks,
- overly large kits filled with tools you will never use,
- or anything that feels like it was designed more for volume than precision.
With tools like this, cheap often becomes expensive the moment it slips across a lug.
What else you need before changing a strap
This is where careful owners separate themselves from impatient ones.
Before you start, set up the workspace properly.
You need:
- a soft microfiber cloth or watch mat,
- low-tack tape such as painter’s tape,
- good lighting,
- a tray or small container for spring bars,
- and ideally a little patience you are not pretending to have.
That last part matters.
Do not do your first strap change when you are rushing out the door.
A clean setup matters for long-term care too. If you are building better overall watch habits, Everyday Watch Care Guide: How to Keep Your Watch Looking New and Weekly Watch Care Routine: A Simple 10-Minute System to Extend Your Watch’s Life fit well with this skill.
How to change a strap without scratching the lugs
Here is the practical step-by-step method.
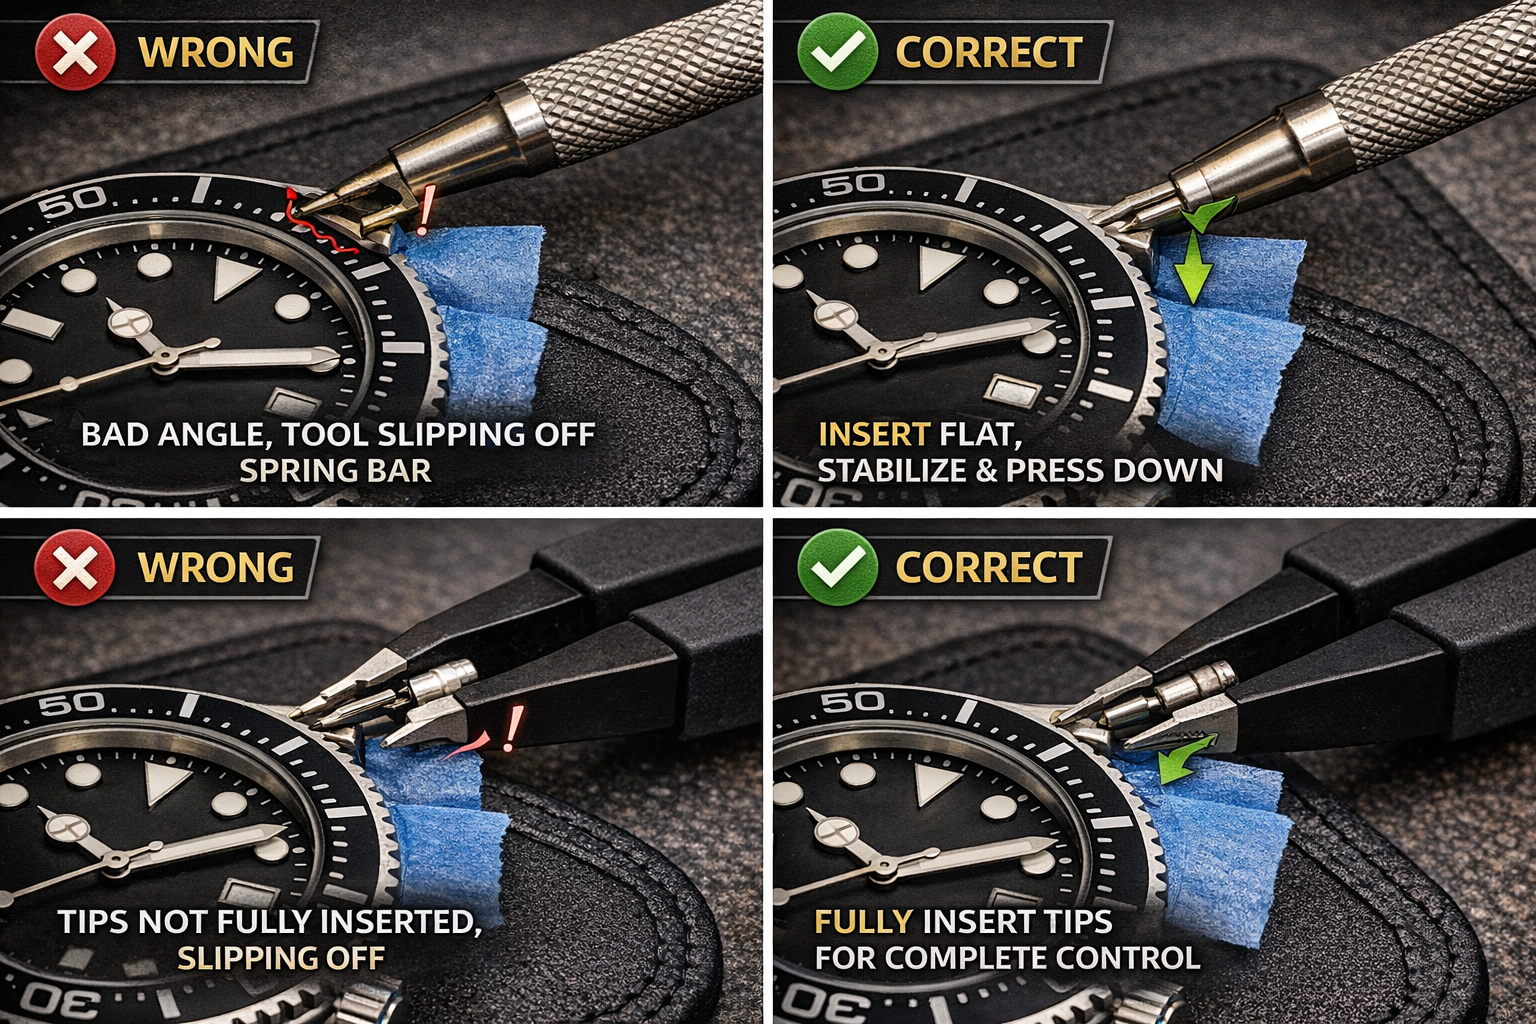
Step 1: Tape the inside of the lugs
This is the easiest habit that prevents the most regret.
Place a small strip of low-tack tape on the inside face of each lug, especially near the spring bar hole area. You can also tape a little of the outer lug surface if the working angle feels risky.
A lot of people skip this because they want the process to feel “cleaner” or faster.
That is a mistake.
Tape is cheaper than regret.
Step 2: Lay the watch flat and stable
Put the watch face-down or side-supported on a soft cloth, depending on the strap and case shape. The goal is simple: stop the watch from shifting while you work.
If the watch moves when you apply pressure, the chance of slipping goes up immediately.
Step 3: Find the spring bar shoulder
Slide the forked tip gently between the strap and the inside of the lug until you feel the small shoulder of the spring bar.
Do not stab around blindly.
This is the moment where beginners cause scratches: too much pressure, not enough control, and no patience to actually locate the bar.
Step 4: Compress inward, then guide the strap down
Once the fork catches the shoulder, press inward toward the strap to compress the spring bar. At the same time, gently pull or guide the strap end down and away from the lug hole.
This is not a force move.
It is a pressure-and-release move.
The idea is to free one side cleanly.
Step 5: Remove one side first, then the other
Once one end is out, the second side usually comes away easily.
Hold the spring bar so it does not jump out and disappear into another dimension under your desk.
Step 6: Inspect the spring bar before reinstalling
This is a step people skip far too often.
Before putting the strap back on, inspect the spring bar.
Check for:
- bent ends,
- weak spring action,
- corrosion,
- rough shoulders,
- or any sign that it no longer feels secure.
A worn spring bar is a small cheap part that can cause a very annoying watch drop.
Step 7: Reinstall with the top side seated first
Insert one end of the spring bar into one lug hole, compress the other end with the fork, then guide it into place carefully.
When it clicks in, do not assume it is seated.
Step 8: Wiggle-test the strap before wearing
Pull the strap gently in different directions to confirm the spring bar is fully seated. If there is any doubt, do it again.
Never trust a half-seated spring bar just because it “seems okay.”
How to change a bracelet without losing your mind
Bracelets are trickier than straps because metal end links give you less room to work.
Here is the smart approach:
- tape the lugs more generously,
- use stronger lighting,
- work with the bracelet partly open so you have space,
- and if the end links are tight, consider whether this is exactly the kind of job where a tweezer-style tool makes life easier.
Bracelet work is also where fit matters more after installation. Once the bracelet is back on, Watch Bracelet Sizing Guide: How Tight Should It Be? (Comfort, Fit Tests & Fixes) will help you actually dial in comfort instead of stopping at “it’s attached.”
The 5 most common mistakes people make
1. Using a cheap, thick fork
This is the classic mistake. If the fork cannot get into the space cleanly, you are already starting badly.
2. Not taping the lugs
It feels optional until the scratch happens.
3. Rushing the first side
Most damage happens because people try to “just get under it” without actually locating the spring bar shoulder.
4. Reusing damaged spring bars
A bent or weak spring bar is not worth trusting.
5. Assuming every strap fits every watch equally well
Some straps are thicker, stiffer, or cut differently near the spring bar. Fit varies more than people expect. If you are still deciding which material actually suits your watch and lifestyle, Watch Strap Materials Guide: Bracelet vs Leather vs Rubber vs Nylon (What to Choose) is the better starting point.
Which tool is best for different owners?
Here is the simplest decision guide.
| You are… | Best tool choice |
|---|---|
| A beginner changing leather or rubber straps a few times a year | Good fork-tip spring bar tool |
| A regular strap swapper with several watches | Fine fork tool with replaceable tips |
| Mostly changing bracelets with fitted end links | Tweezer-style spring bar tool |
| Working with drilled lugs | Tool with a useful pointed end |
| Buying one tool and stopping there | Quality fork-tip tool |
When you should not do it yourself
Most strap changes are absolutely manageable at home. But there are times when it makes sense to hand the job to someone experienced.
That includes:
- very tight integrated-style bracelets,
- soft precious-metal cases,
- sentimental or high-value watches you are nervous about,
- or situations where you already know your hands are not steady enough for fine work.
Doing it yourself is satisfying.
Forcing it when you are not comfortable is not smart.
Why this small skill matters more than it seems
Changing a strap is not just a small maintenance trick.
It changes how often you actually wear a watch.
A watch that feels too formal on bracelet might become a weekend favorite on rubber. A watch that feels too sporty on rubber might suddenly work beautifully on leather. A watch that feels heavy in summer may become much easier to enjoy on nylon.
That is why strap changes are not just about saving money. They are about unlocking more use from the watches you already own.
And once the watch is off the wrist, it is also a good time to clean around the lugs and case sides lightly before reinstalling the strap. That kind of habit is part of better long-term ownership. When the watch is not being worn, How to Store Watches Properly When Not Wearing Them becomes the next logical step.
Bottom line
If you only buy one spring bar tool, buy a good fork-tip model with a fine replaceable tip.
That is the tool most owners actually need.
And if you want to change a strap without scratching the lugs, remember this:
The trick is not strength.
It is control.
Tape the lugs.
Use a soft surface.
Locate the spring bar shoulder carefully.
Compress with intention, not impatience.
And inspect the spring bars before you put everything back together.
Do that, and strap changes stop feeling risky very quickly.
They start feeling like one of the easiest ways to enjoy a watch more.
FAQ
What is the best spring bar tool for beginners?
A quality fork-tip spring bar tool with a fine, replaceable tip is the best starting point for most beginners.
Can I change a watch strap without a spring bar tool?
Sometimes, but it is usually harder, less precise, and much riskier for the lugs. A proper tool is worth having.
How do I stop scratching my watch lugs?
Use tape, good lighting, a soft surface, and a fine fork tool. Most scratches come from rushing or using a poor-quality tool.
Do I need a tweezer-style spring bar tool?
Not necessarily. It is most useful for frequent bracelet changes and tighter end-link setups. Most casual owners can start with a standard fork-tip tool.
Should I reuse old spring bars?
Only if they still feel strong, straight, and secure. If there is any doubt, replace them.
Is changing a bracelet harder than changing a strap?
Yes, usually. Bracelets often leave less room to work, especially around fitted end links.
